Program your Better Go Button!
Changing the default functionality of your Better Go Button is easy! All you need is a computer.
**If your BGB was purchased before 09/2024, you’ll need to update the firmware to v2 first. Please get in touch for instructions.
Setup
Here are the steps to edit your button using the VIAL software interface.
You can download and install the open source software or run it in a chrome browser. It’s completely up to you. The only real difference I’ve found is that recording macros is easier and layouts can be saved and loaded with the downloaded software.
- Plug your BGB into the computer.
- Open the VIAL interface with one of the following methods:
- Software
- Download and install Vial app from get.vial.today/download.
- Open the app.
- The device should be automatically recognized.
- Browser
- Navigate to vial.rocks from a chrome browser.
- Click ‘Start Vial.’
- Click the ‘BetterGoButton’ then ‘Connect’ when asked.
- Software
- You are now able to customize the keys and backlight using the Vial interface!
- For the Better Go Button and Buzzer, use only the lower key.
- For the Better Go Panel, the buttons match.
- You can find documentation for the VIAL here however, I’ll play the hits below.
Programming
- Backlight Level – Choose the ‘Lighting’ tab from the upper panel. Slide the ‘Backlight Brightness’ slider accordingly.
- Assign a single key – Choose the ‘Keymap’ tab from the upper panel. Click the BGB key you’d like to program, then choose what to assign to it from the lower panel.
- Default Keys – The default keys can be found in the ‘User’ tab.
- Macros – Building and assigning a macro can be done in two steps.
- Build
- Click the upper tab ‘Macros.’
- Click the macro you want to edit. ‘M2’ for example.
- Construct the macro using any combination of the buttons below.
- Taps – Add a tap action then choose the type and key.
- Action – Add a text string.
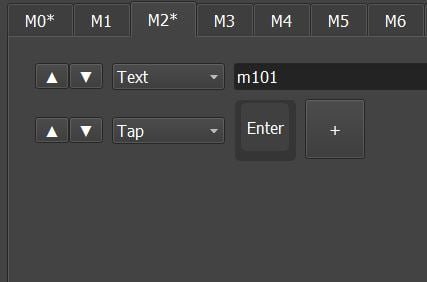
- An example of sending EOS Macro 101 would look like this:

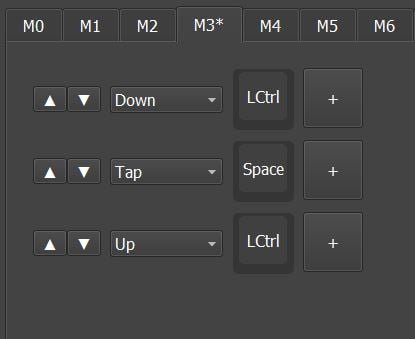
- An example of sending Control + Space Bar would look like this:

- Save – Don’t forget to click ‘Save’ when finished.
- Assign
- Click the upper tab ‘Keymap.’
- Click the BGB key you’d like to program, then choose what macro to assign to it from the lower panel ‘Macro’ tab.
- Build
- MIDI
- MIDI can be assigned using the keys in the lower ‘MIDI’ tab.
- Notes – Simply assign the desired note to a button.
- Settings – To change a setting like the channel, octave or velocity, assign that setting key to a button, then press the button.
- MIDI settings are not persistent, so they will return to defaults after a power cycle. If you are using non-default settings, I’d recommend using a macro.
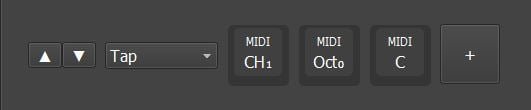
 This macro sets the channel to 1, the octave to 0 and then sends note C.
Here’s the code for this macro,[["tap", "MI_CH1", "MI_OCT_0", "MI_C"]]You can copy it into your macro text editor if you want it.
If you store this macro and assign it to the key instead, the settings will be retained.
- MIDI can be assigned using the keys in the lower ‘MIDI’ tab.
 This macro sets the channel to 1, the octave to 0 and then sends note C.
 Tips
Keep in mind that generic keys repeat when held, which is not great for triggering cues!
To get around this, use the macro functionality to send the proper keys instead. This way, you only get one trigger per press, regardless of how long you hold it for.
Here’s a free web page that you can use to test keyboard input. You can and should set it to make a quack sound when it detects a key!
https://www.ratatype.com/keyboard-test/